The![]() first thing the user sees after logging into the system is an overview displayed as tabs in the Home menu.
first thing the user sees after logging into the system is an overview displayed as tabs in the Home menu.
The available tabs and their content vary depending on the user’s role. A user or administrator without supervision rights can only see their own attendance data. A user or administrator with supervision rights can also view the attendance data of the users they supervise.
Tabs visible to all roles:
- Plan
- Presence overview
- Access overview
- Monthly summary holiday
- Activity preview *
- Summary preview of activity *
* Only if Activities are enabled (Administration → Company → edit Company → Advanced Mode → Application tab → Features tab → Activities).
- diets**
** Only if Diets are enabled (Administration → Company → edit Company → Advanced Mode → Application tab → Attendance tab → Attendance types → Diets).
New tabs visible to all roles:
- Overview of arrivals
- Cameras
- Parking
Tabs visible to users with supervision rights or to administrators:
New tabs available to users with supervision rights or administrators:
- Preview alcohol testing
- Alcohol testing
- Administration
Existing tabs can be edited by clicking the Settings button (![]() ) in the top right corner. To add a new tab, click the [+] Add button either in the tab panel on the left side of the screen or from the dropdown menu in the Home section.
) in the top right corner. To add a new tab, click the [+] Add button either in the tab panel on the left side of the screen or from the dropdown menu in the Home section.
In the Home menu, by clicking on the More option, you can restore the default tabs or set whether the tabs should be displayed on the left side of the screen or not.
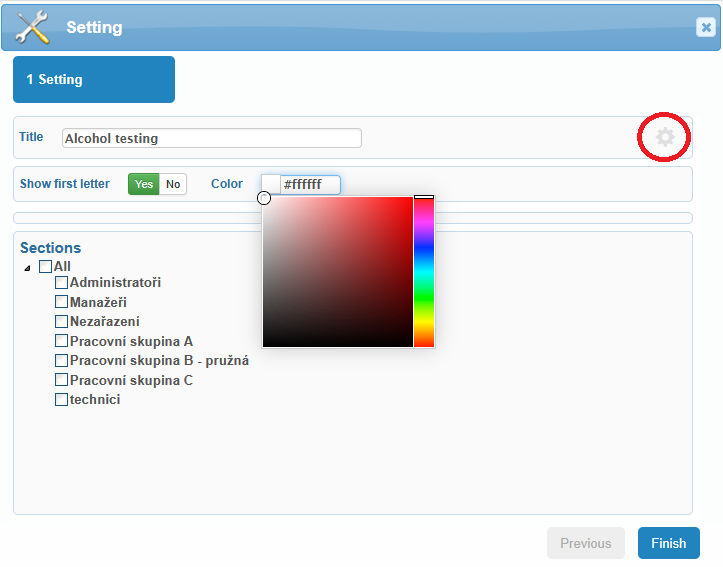
In Settings, you can change the icon color for each tab or hide the first letter of the tab label. To edit, click (![]() ) next to the tab label and choose whether to display the letter or change the tab color according to your preferences.
) next to the tab label and choose whether to display the letter or change the tab color according to your preferences.

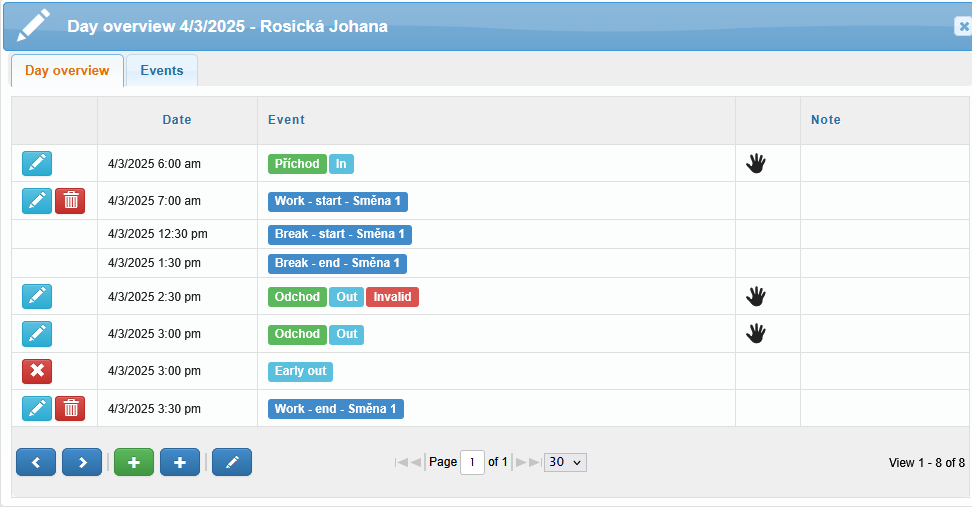
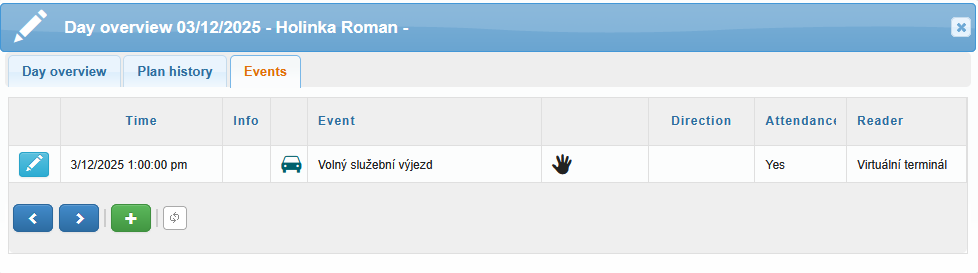
The day preview shows a detailed breakdown of the plans and events for the selected day. Absence plans can be edited (![]() ) and deleted (
) and deleted (![]() ). ou can also add new events (
). ou can also add new events (![]() ), plans (
), plans (![]() ) or directly access the user’s editing page using the icon (
) or directly access the user’s editing page using the icon (![]() ). If an attendance error occurs, the event can be immediately corrected (
). If an attendance error occurs, the event can be immediately corrected (![]() ).
).
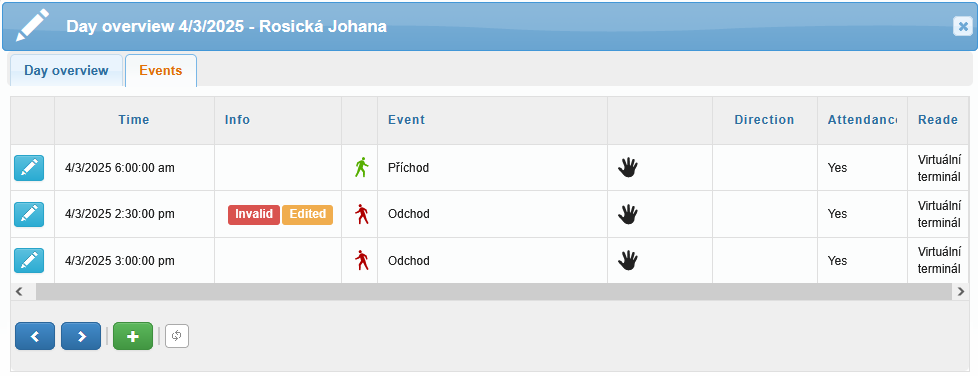
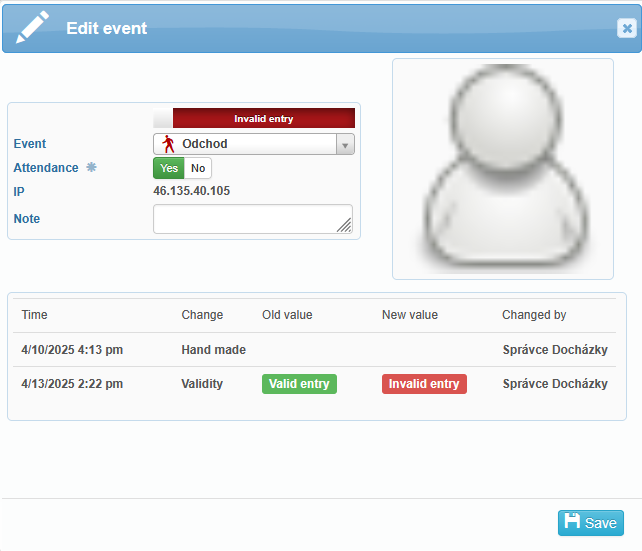
Events can only be edited (![]() ) – you can change the access type (e.g., from departure to arrival) or invalidate the access type. Invalid access will not be counted towards attendance.
) – you can change the access type (e.g., from departure to arrival) or invalidate the access type. Invalid access will not be counted towards attendance.
The activity preview displays the entered activities and their attributes. You can open it by clicking the blue circle in the top right corner of the selected day, or by hovering over a specific day and selecting the icon![]() .
.
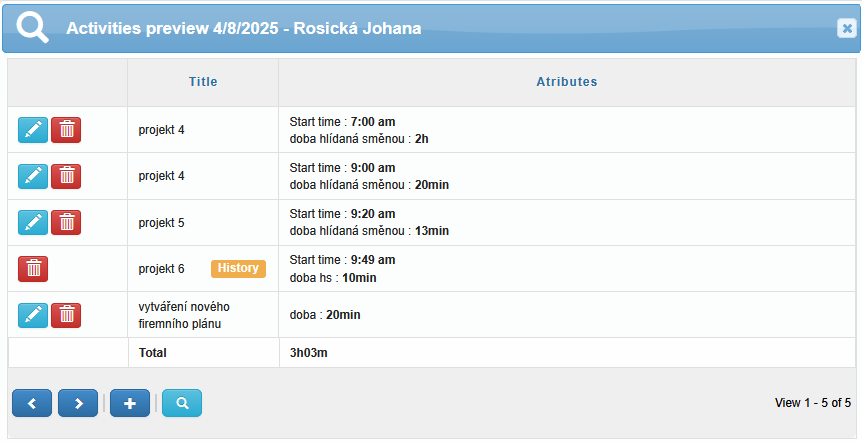
Activities can be edited (![]() ) and deleted (
) and deleted (![]() ). You can also add new activities (
). You can also add new activities (![]() ) or click the icon
) or click the icon![]() to navigate to the day preview.
to navigate to the day preview.
![]()
Using the controls in the top left corner, you can view the user’s name and navigate between users sorted alphabetically using the left/right arrows. The date controls allow you to open a monthly calendar, switch between weeks, jump to the current day, or refresh the entire tab.
![]()
In the top right corner, you will find the tab controls. These include a button to (show/hide) all user errors, a search field, settings, and full-screen view.
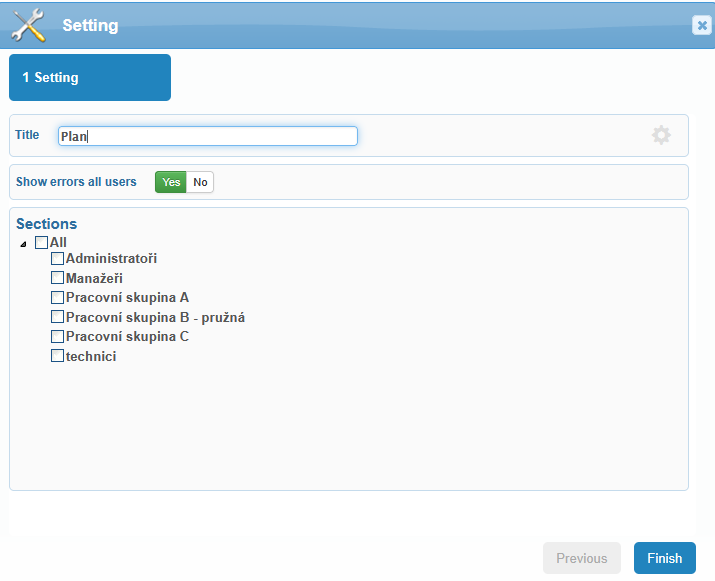
In the settings, you can define a custom label, enable the option to display errors for all users, or select specific work groups.
In the top-right corner, you’ll find the tab controls. These include a search field, settings, and a full-screen view option.
![]()
In the search field, you can select the name of a work group configured for your company from the dropdown menu.
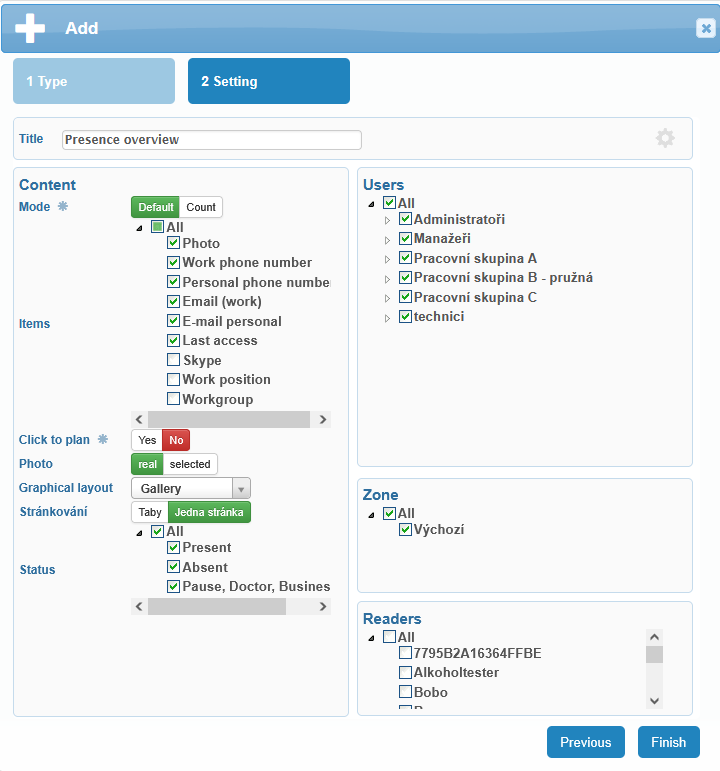
In the Setting section, you can define a custom label and specific configuration for the tab.
- Content
- Mode
- Default
- Count – Displays the number of users currently present, on a break, at a doctor’s appointment, on a business trip, absent, and the total number of users
- Items
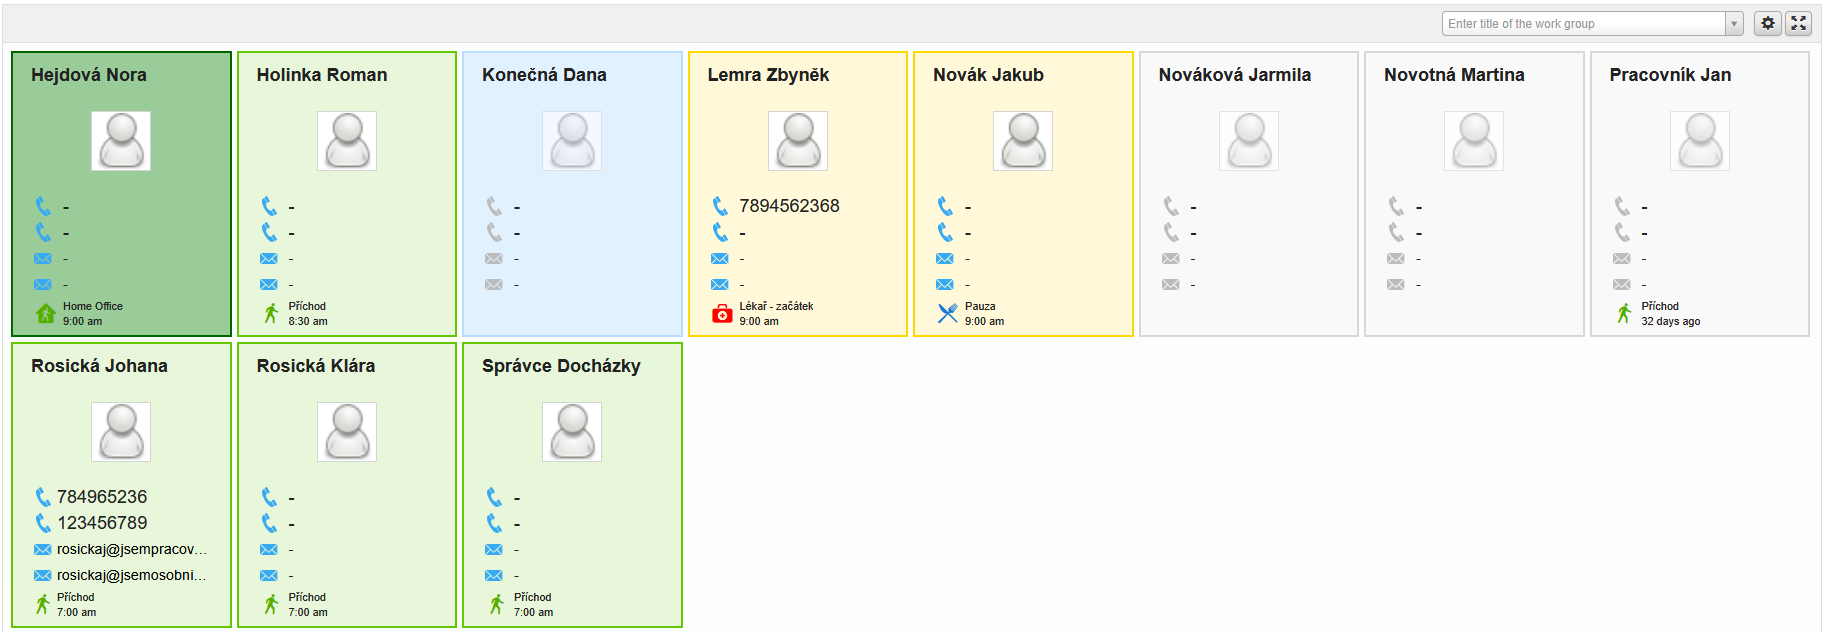
- Photo, Work phone number, Personal phone number, E-mail work, E-mail personal, Last access, Skype, Work position, Work group
- Click to plan – Clicking on a user’s name displays their Plan
- Yes / No
- Photo
- Real – Photo captured by the reader during access
- Selected – Custom photo set by the user
- Graphical layout – Galery / Line
- Pagination
- Tabs
- Single page – All users are displayed on a single page
- Status – When Single Page is selected, this option allows you to filter users by their status: present, absent, or temporarily absent (e.g., pause, doctor, business trip).
- Mode
- Users – Displayed according to the configured work groups
- Zone – Displayed based on the configured zones
- Readers – Displayed based on the assigned readers

![]()
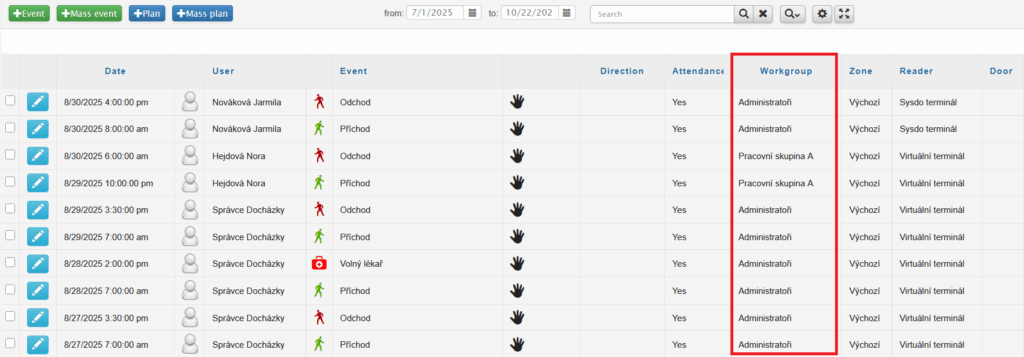
In the top right corner, you can find the tab controls. These include the date range selector (from – to), a search field, advanced filtering options (event, method, attendance, area, reader, door), settings, and full-screen view.
![]()
Using the icons in the top left corner, you can add an event or a plan for individual users. There are also icons available for adding an event or a plan for multiple users at once.
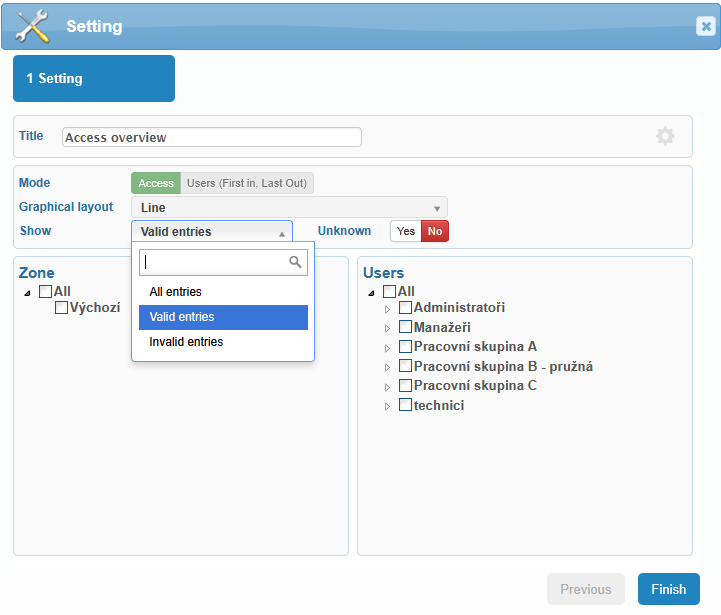
In the Settings tab, you can set a custom title. On the right side, by clicking the icon ![]() , you can choose the tab letter display and tab color. You can then configure the Mode (Accesses / Users – first entry, last exit), Layout (graphical arrangement), and Record Display (all, valid, invalid). The Unknown option – when set to Yes – displays only unknown records. You can also select specific zones and users to display.
, you can choose the tab letter display and tab color. You can then configure the Mode (Accesses / Users – first entry, last exit), Layout (graphical arrangement), and Record Display (all, valid, invalid). The Unknown option – when set to Yes – displays only unknown records. You can also select specific zones and users to display.
There are three types of graphical layouts for the access log overview – Line, Line with gallery, and Timeline. Once a layout type is selected, it can no longer be edited in the settings (the same applies to the Mode). If you wish to change the layout later, you will need to create a new tab.
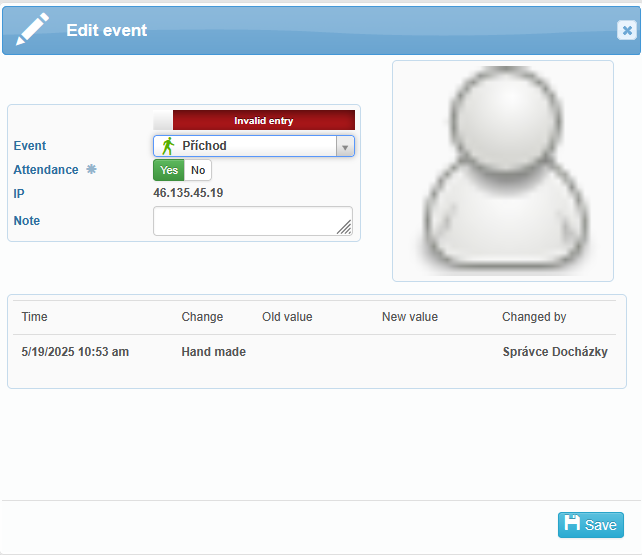
Events can be edited – for example, you can change the type of access (e.g., from exit to entry) or mark the access as valid or invalid. Invalid access entries are not counted towards attendance.
An event can also be automatically marked as invalid. If the interval between two access events is less than 15 seconds, the earlier events are invalidated and only the most recent one is kept as valid.
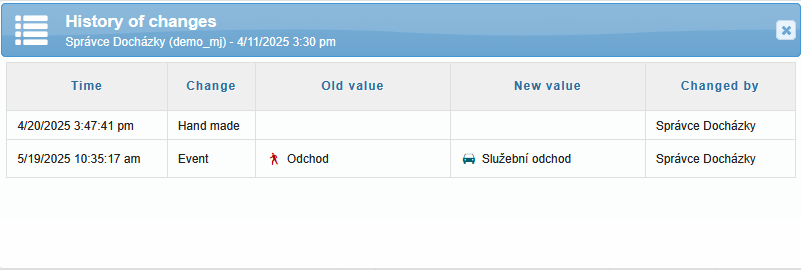
All changes made to access records are logged. The history of these changes can be viewed either in the access editing window or in the access overview table by clicking the icon ![]() in the User column.
in the User column.
The access overview also offers bulk editing of events. With a single button, you can select all events, deselect all, or select a range of events between two selected entries. All selected events can then be marked as either valid or invalid at once.
![]()
The tab is automatically refreshed every minute, but it can also be manually refreshed by clicking the corresponding button.
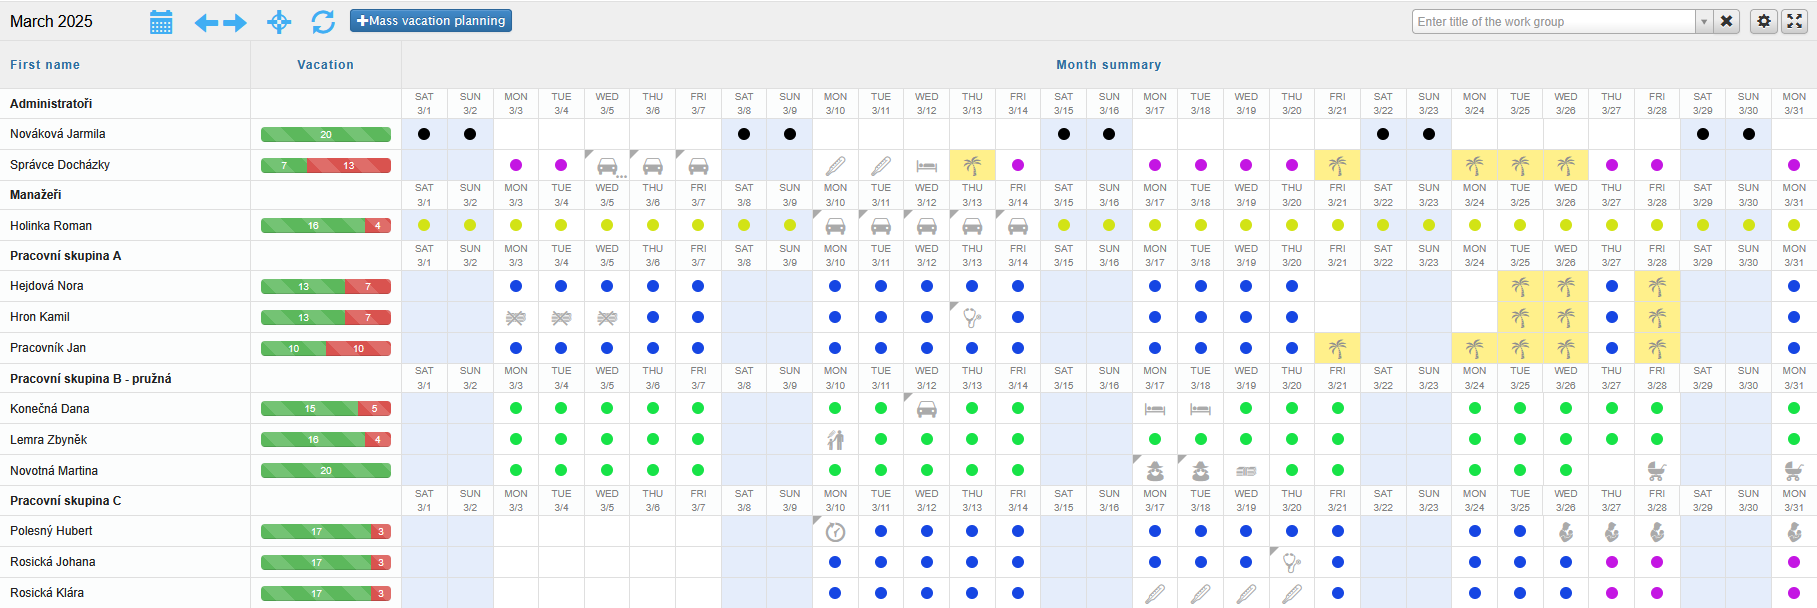
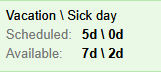
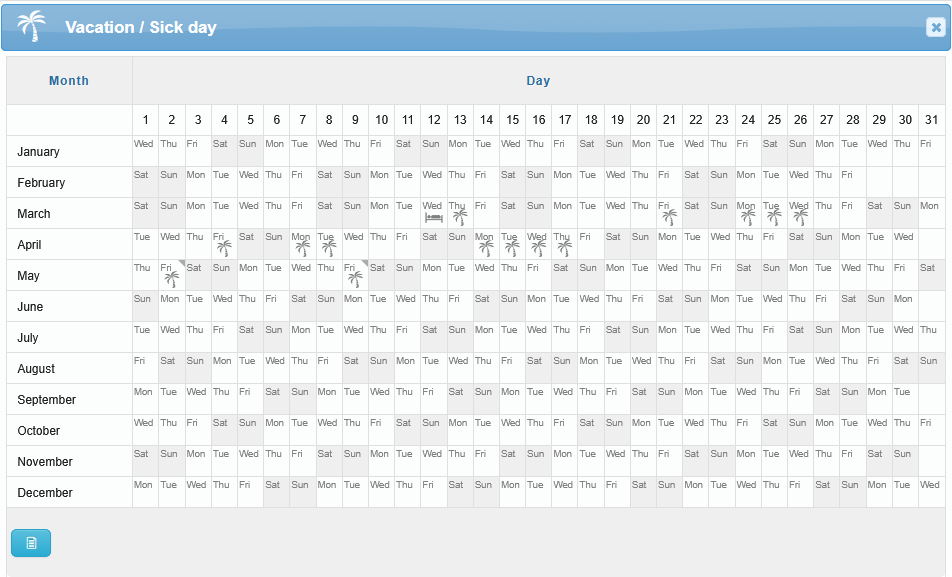
The Monthly summary holiday provides a summary of all employees in the company and their scheduled (non-)attendance.
Its primary purpose is to help employees plan their own vacations with visibility into their colleagues’ scheduled time off, reducing the risk of overlapping absences in situations where coverage is needed.
The tab is configured in Administration – Company – edit Company – Application tab – Components – Monthly summary holiday.
The tab displays users grouped by work groups, their vacation allowance (and usage), and a monthly overview of each user’s attendance — both past and scheduled.
Circles represent work schedules (based on assigned shifts), while icons indicate absence plans. Each shift can have a different circle color. You can set the circle color in Administration – Work Shifts – edit ![]() – Report Informations – Color.
– Report Informations – Color.
The logged-in user can submit new requests directly from the overview. A user with supervisor rights, or an administrator, can use the overview to enter planned schedules.
![]()
Using the controls in the top left corner, you can display the monthly calendar, navigate between months, switch to the current month, or refresh the entire tab.
The Mass Vacation Planning icon allows you to schedule vacation for multiple users.
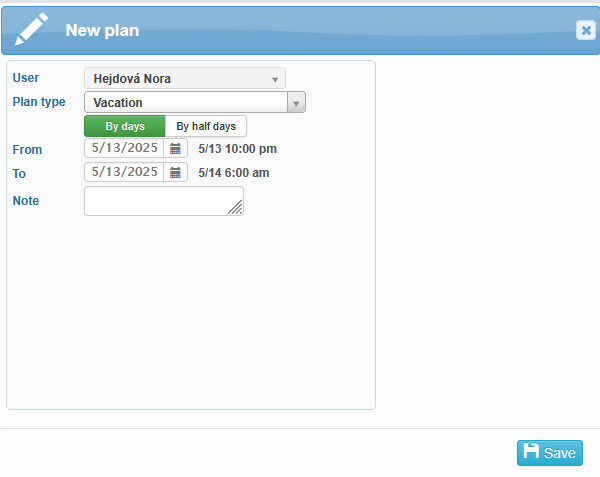
In the Plan Type field, select the type of absence. Then choose the absence date range (From – To). When entering dates, please pay attention to the Notice section below.
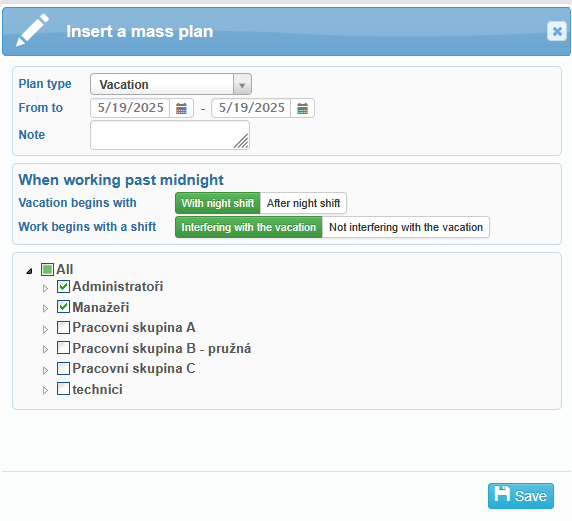
If a user already has an existing absence type scheduled (e.g. vacation, doctor’s appointment, family care, etc.) during the time of the bulk vacation plan, an error will be displayed. The affected user must be removed from the mass vacation plan; otherwise, the plan cannot be saved.

Clicking the absence icon ![]() for a selected user opens the Day Preview window.
for a selected user opens the Day Preview window.
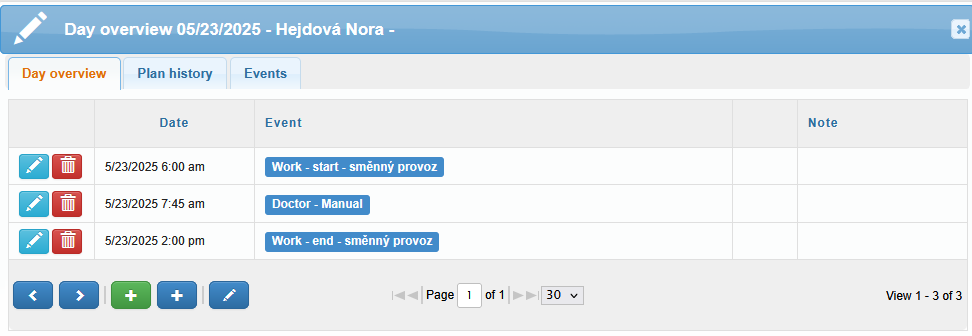
In the Day Preview tab, events and comments are displayed and can be edited as needed. The icon ![]() is used to add new events, the icon
is used to add new events, the icon ![]() is for adding new schedules, and the icon
is for adding new schedules, and the icon ![]() is used to edit users.
is used to edit users.
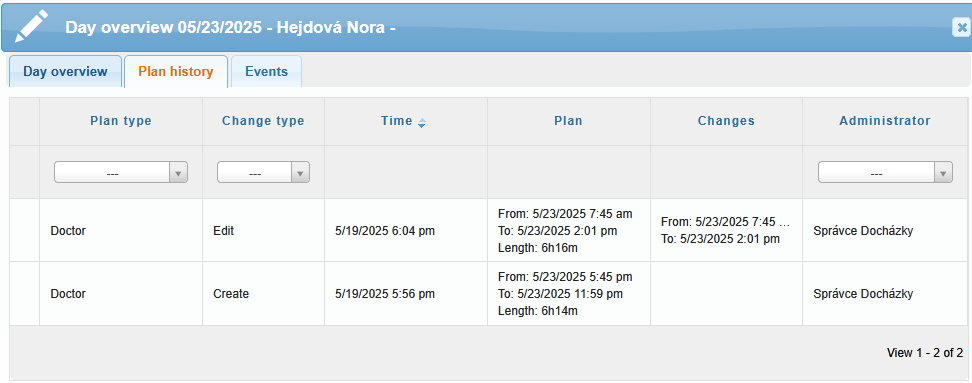
The Plan History tab contains information about the plan type, type of change, time of change, the original plan, the changes made, and the administrator who performed the change. The final tab displays saved events.
If the user has no absence type set (i.e. they are present at the workplace), a new plan can be added by clicking the circle in the plan.
![]()
In the top right corner, you’ll find the tab controls: a search field, setting, and full-screen view.
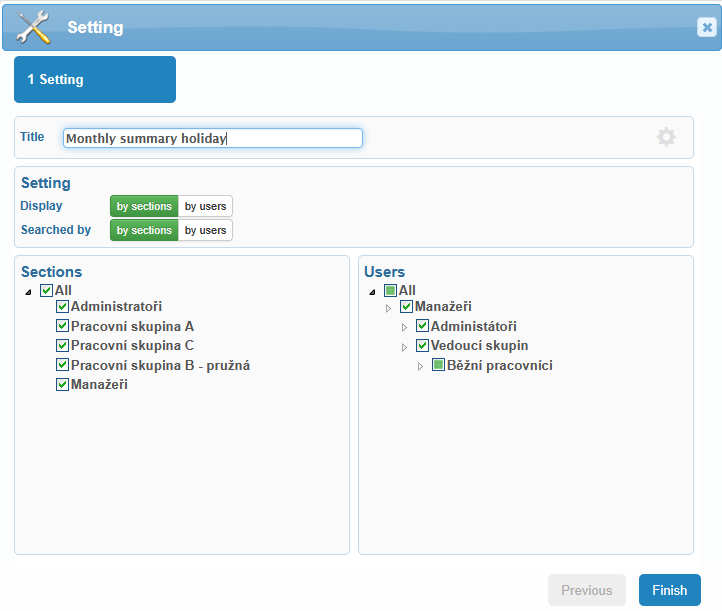
In the setting, you can enter a custom title. On the right side, by clicking the icon ![]() , you can choose the letter displayed on the tab and set the tab color. Users in the Monthly summary holiday can be viewed or searched by work groups (sections) or individual users. If no work group or user is selected, the settings cannot be saved.
, you can choose the letter displayed on the tab and set the tab color. Users in the Monthly summary holiday can be viewed or searched by work groups (sections) or individual users. If no work group or user is selected, the settings cannot be saved.
The Activity Preview displays user activities within a selected time period. You can filter the results in the top right corner by selecting a time range (the default is the last seven calendar days).
In the Settings tab, you can enter a custom title. On the right side, by clicking the icon ![]() , you can choose the letter displayed on the tab and set the tab color.
, you can choose the letter displayed on the tab and set the tab color.
You can also choose whether to display activities based on their approval status, select activity types, and choose specific users.
The full-screen icon ![]() allows you to switch to full-screen view.
allows you to switch to full-screen view.
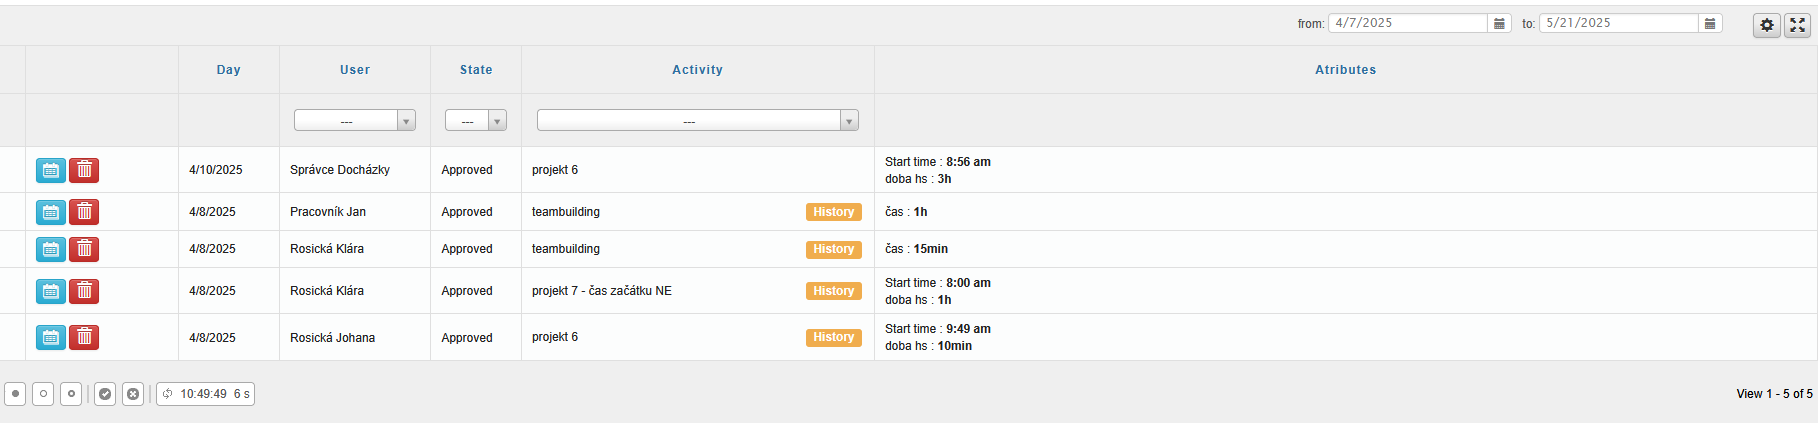
In the first column of the table, you can select activities that require approval and then approve or reject them.
The bottom left corner of the table also provides bulk editing options for activities. With a single button, you can select all activities, deselect all, or select only the activities between two selected ones. All selected activities can then be approved or rejected at once.
![]()
The tab is automatically refreshed every minute, but you can also manually refresh it by clicking the corresponding button.In the next column, you can approve ![]() , edit
, edit ![]() , delete
, delete ![]() , or view
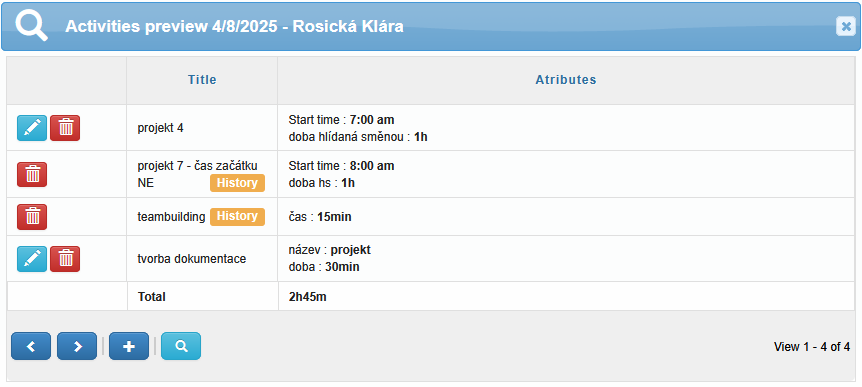
, or view ![]() individual activities. By clicking View, you’ll see all activities for the selected day, along with the total time worked on that day. If an activity hasn’t been approved yet, or has been rejected, the time spent on it will not be included in the total time for that day.
individual activities. By clicking View, you’ll see all activities for the selected day, along with the total time worked on that day. If an activity hasn’t been approved yet, or has been rejected, the time spent on it will not be included in the total time for that day.
You can add a new activity using the Add ![]() icon. The Preview
icon. The Preview ![]() icon takes you to the day overview, where you can see detailed information about events.
icon takes you to the day overview, where you can see detailed information about events.
The other columns contain information about:
Day
User
State (new, rejected, approved)
Activity (including edit history
 , such as status changes after administrator approval)
Attributes

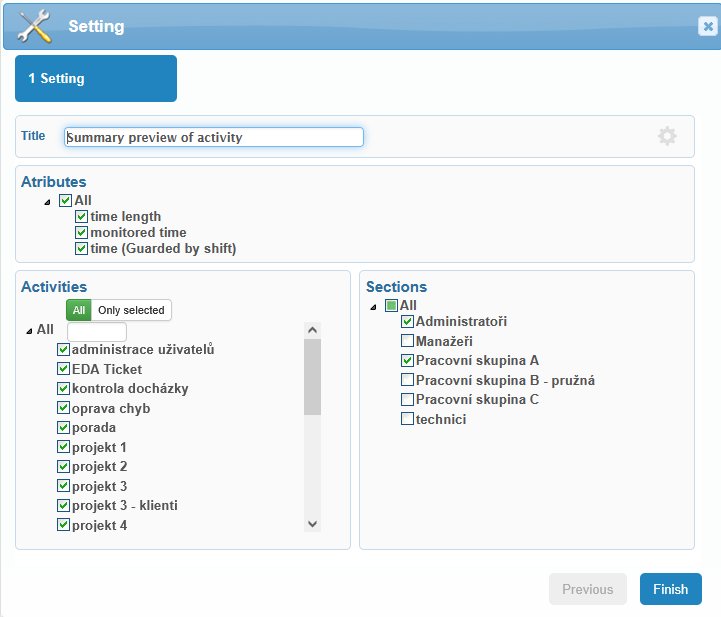
The Summary preview of activity is used to compare the time spent on various activities (attributes Time and Tracked Time) with the total worked time.
The tab displays users grouped by work groups, a breakdown of worked time by activity (color-coded according to activity type), and a monthly overview of time spent on activities for each day.
![]()
The breakdown of time spent on activities is color-coded as follows:
Red (0–25%)
Yellow (25–50%)
Blue (50–75%)
Green (75–100%)
Activities can be added directly from the activity overview, and existing activities can also be viewed.
![]() Using the controls in the top left corner, you can display the monthly calendar, navigate between months, jump to the current day, or refresh the entire tab. You can also use this section to schedule vacation time for multiple users at once (see the Monthly summary holiday chapter for details).
Using the controls in the top left corner, you can display the monthly calendar, navigate between months, jump to the current day, or refresh the entire tab. You can also use this section to schedule vacation time for multiple users at once (see the Monthly summary holiday chapter for details).
![]()
In the top right corner, you’ll find the tab controls: a search field, setting, and full-screen view.
In the Setting tab, you can enter a custom title. On the right side, you can click the icon ![]() to choose the letter displayed on the tab and select the tab color. You can also choose which attributes, work groups, and activities to display. If no work group is selected, the tab will display the default work group.
to choose the letter displayed on the tab and select the tab color. You can also choose which attributes, work groups, and activities to display. If no work group is selected, the tab will display the default work group.