Table of contents
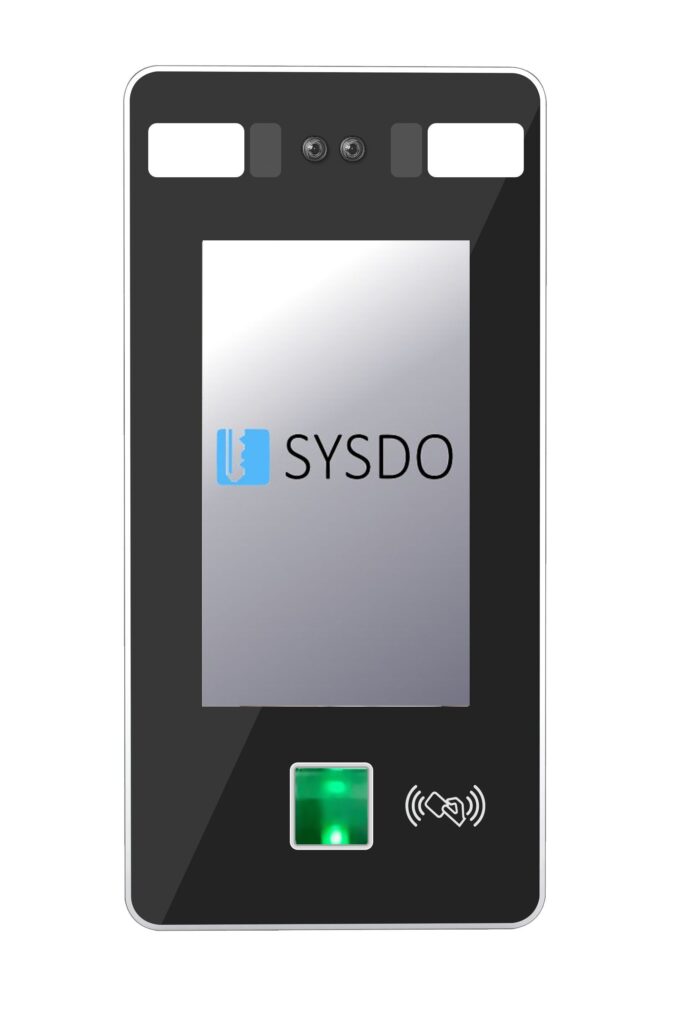
The reader is suitable for recording and controlling access of individuals using facial recognition, biometric fingerprint scanning, or card/chip authentication. Communication is carried out via WiFi or TCP/IP.
The system does not store any biometric or sensitive data, only a mathematical code. The only exception is the use of photographs from the access reader, which are not required for the system to function. They serve merely as a visual aid, for example, in the attendance overview. The use of photographs can be completely disabled.
You can find the SYSFP815FTW reader in our e-shop, or contact your sales representative.
1. Editing the reader from the web application
model: Face
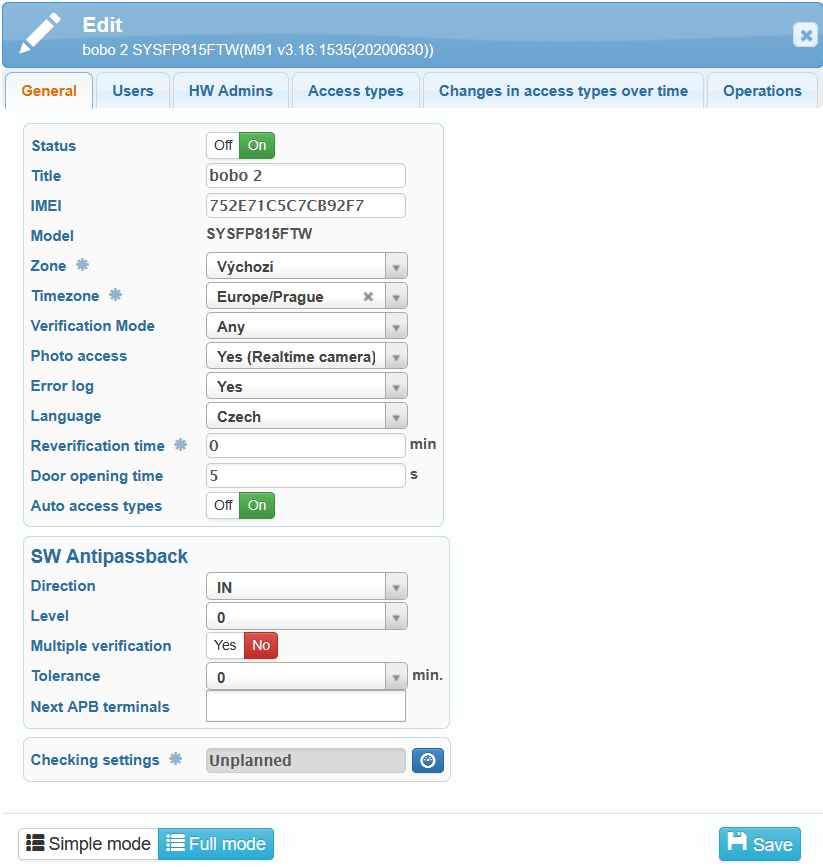
IMEI is a unique identifier of the reader and must be entered correctly for the device to communicate properly.
Readers can be assigned to different zones, for example by building or floor. In the access overview, you can then filter entries by these zones.
User verification is carried out using facial recognition, fingerprint, password or card. It is also possible to configure different combinations of verification methods:
Fingerprint or card or password
Face only
Fingerprint only
Card only
Card + fingerprint
- Fingerprint + password
Face + card
- Card + password
Face + fingerprint
Fingerprint + password + card
- Face + card + password
- Face + password
The most flexible option is to allow any verification mode.
In the General tab, you can also enable or disable the following functions:
Photo access – takes a photo during access entry. This serves as a visual supplement, which can be used for example in the presence overview or access overview.
Error log – the terminal stores records of errors that occurred during its software operation.
Reverification time – the period during which a user can verify again without sending another event to the server. Reader menu → Settings → Log → Verification time (min). Default value = 0 s.
Door opening time – the period for which the relay remains activated to open the door. Reader menu → Settings → Access → Door open time (s). Default value = 5 s.
Auto access types – when a user performs access on the reader, the type of access is detected automatically, without the need to select it on the reader’s screen.
SW Antipassback – a function that ensures a user cannot repeatedly use the reader to enter or exit without first performing the opposite action. This prevents misuse of the system and guarantees correct tracking of users’ movements.
You can also set the time for checking the settings, when the terminal configuration is compared with the system configuration.
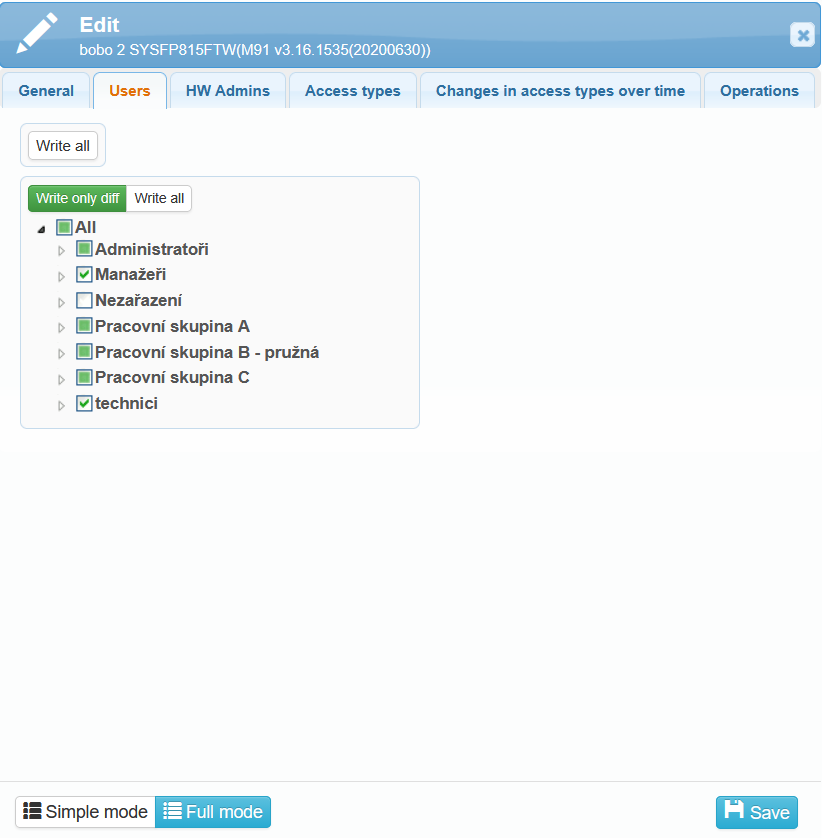
To use the reader, users must be assigned to it.
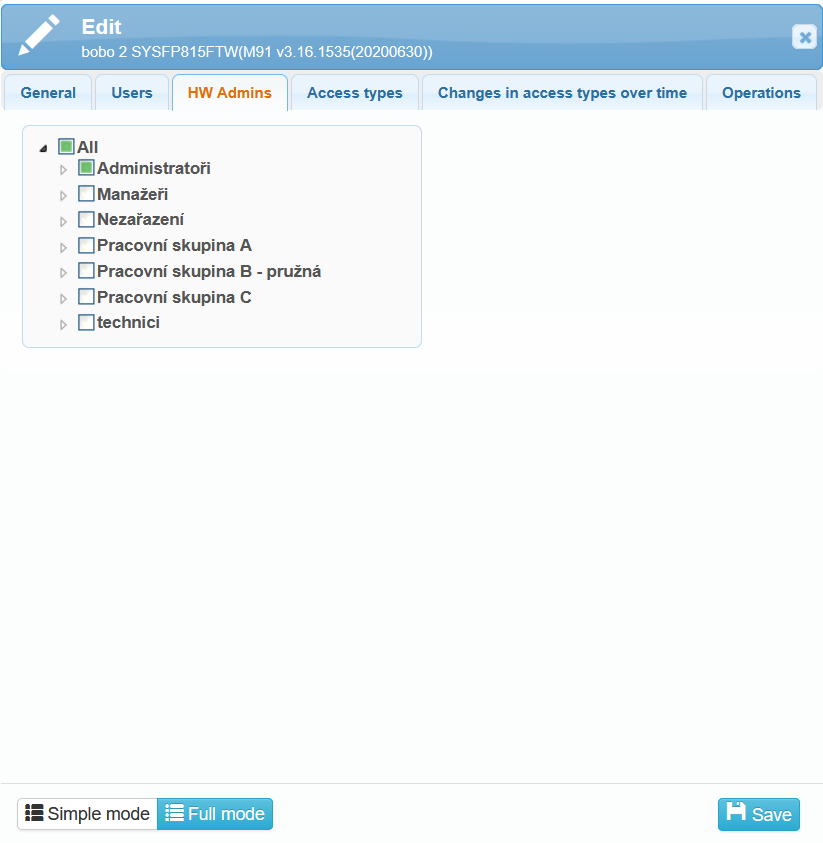
In the HW Admin tab, you can select users who have permission to manage and configure the selected reader. If at least one user with administrator permissions is loaded in the system, access to the main menu requires administrator verification. If the login password is unknown or no other administrator authentication method is possible, you can reset the administrator permissions directly on the reader.
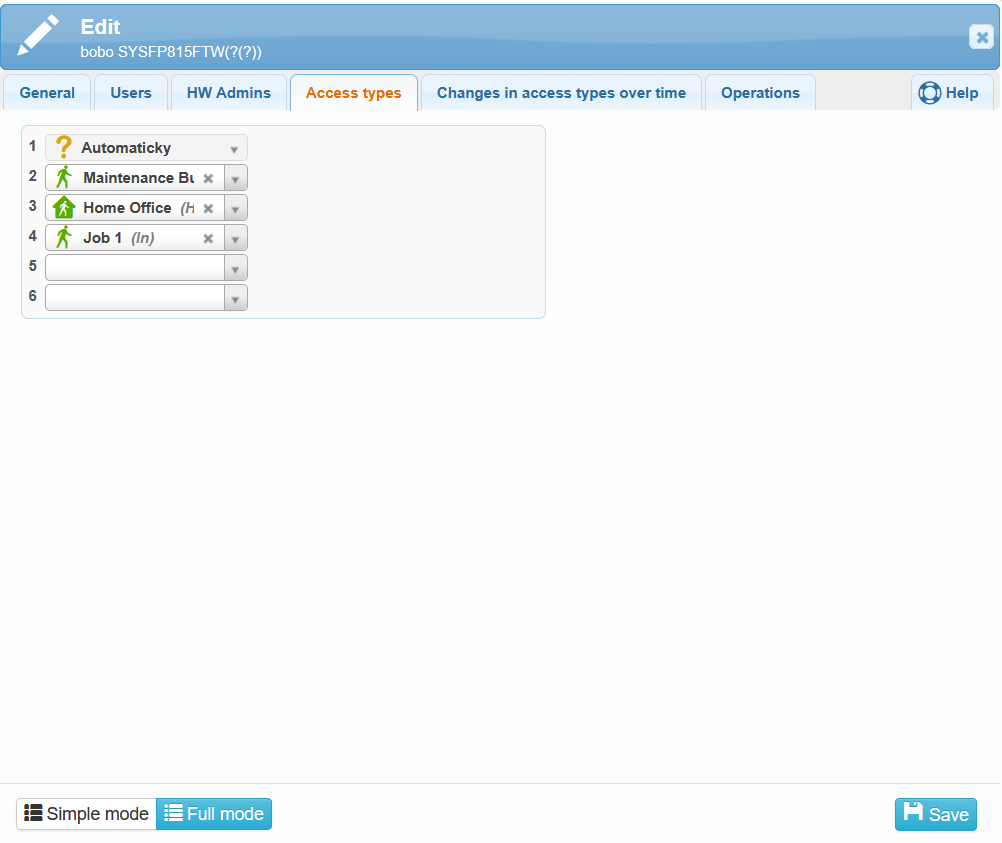
In the Access Types tab, you can assign access types to individual buttons on the reader screen.
If the Auto access types option is enabled in the General tab, the Automatically option appears in the first row of the Access Types tab. The remaining rows can then be configured according to your preferences.
If you do not want to use automatic settings, disable the Auto access types option in the General tab. Even when automatic configuration of arrivals on the reader is disabled, you can still add the Automatic access type to the list of selectable access types.
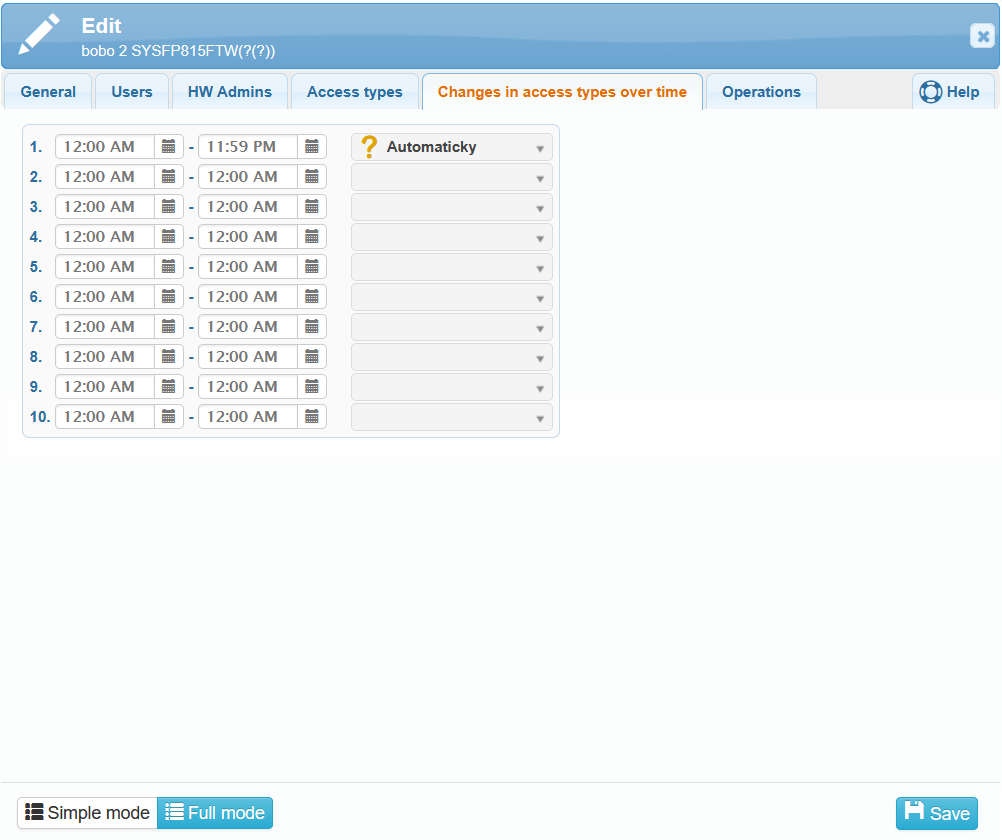
The same principle applies to the Changes in access types over time tab. If the first row is fixed to Automatically with a 24-hour interval, this row and all subsequent rows cannot be modified.
If automatic mode is not enabled, you can define access type time changes. These are used to set scheduled time intervals during which the access types available on the reader are changed automatically.
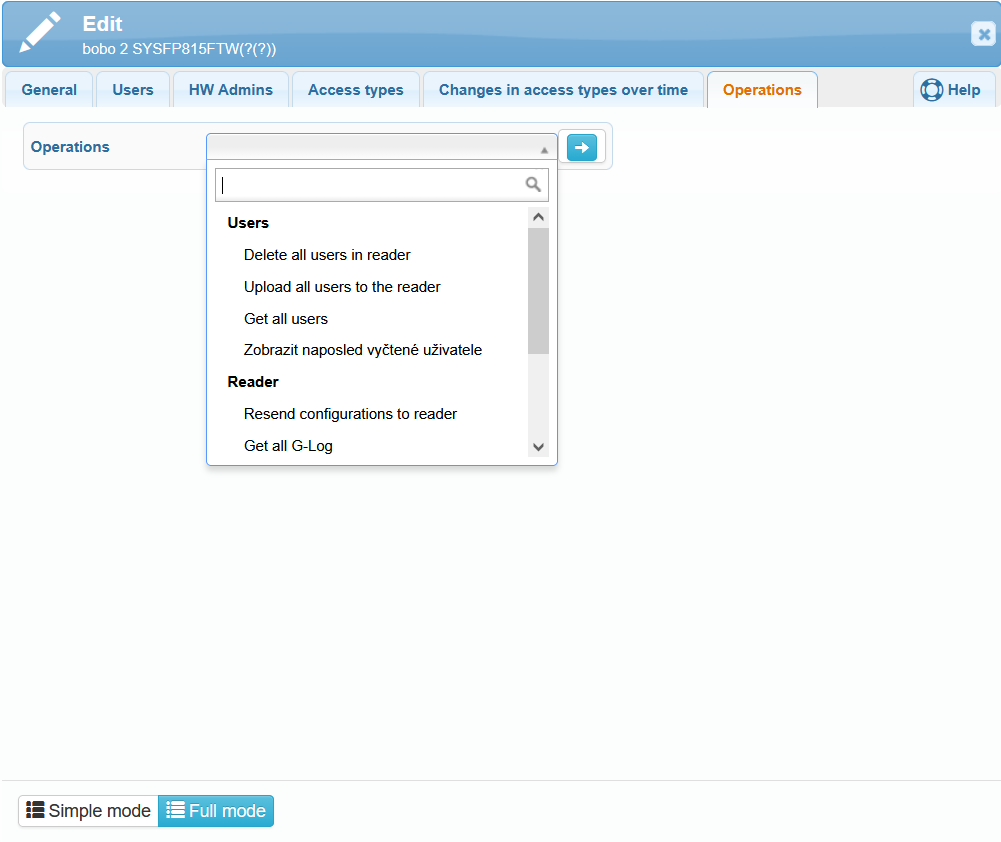
On this tab, you can perform various operations related to the users stored in the reader or to the reader itself.
Delete all users in reader – this operation deletes all users stored in the reader; users will no longer be able to use this reader for access.
Upload all users to the reader – this operation uploads all users stored in the system into the reader.
Get all users – this operation retrieves and displays all users currently stored in the reader.
Show last read users – this operation displays the list of users who were last recognized or read by the reader.
Resend configurations to the reader – this operation re-uploads all configuration settings to the reader (based on the edit form).
Get all G-log
Delete G-log
Reboot – this operation restarts the reader.
Synchronize time – this operation synchronizes the time on the reader.
Read statistics – this operation displays statistical data from the reader, such as access counts, successful and failed authentication attempts, user login times, and other metrics.
G-log – a list of events that occurred on the reader.
We recommend performing operations with caution. Uploading data (depending on its size) may temporarily limit the reader’s operation.
The following section Edit reader in the administrative interface on the device is for informational purposes only and is not required for normal reader operation.
All reader configuration, as well as loading of user authentication data, is performed in the SYSDO web or mobile application.
2. Editing reader in the administrative interface on the device
The little house icon in the downer left corner of the reader’s screen indicates access to the administrator interface. If the reader has a user loaded with administrator rights (Administration – Users – edit user – Permissions tab – HW Reader Administration), verification of this authorized user is required.
The administrator interface offers four main menus: User, Settings, USB Drive, and System Info.
Enroll
In the “User” menu, click the “Enroll” button to add a new user. The displayed table offers preset values for loading a new user. These values can be edited.
The “User ID” field shows the first available user ID. The ID is a unique number assigned to the user that identifies them unambiguously in the system.
After clicking the “Name” field, a virtual keyboard appears, allowing you to enter the user’s name. The keyboard does not include a space bar. The BKSP (Backspace) button can be used to delete previously entered characters. You can also switch between uppercase and lowercase letters and enter special characters (e.g., period, comma, etc.).
In the “Level” field, you can select the user’s permission level: User, Manager, or Administrator.
Clicking the “OK” button saves the data and displays the next menu for loading a card, face, fingerprint, and other user settings.
To register a face, fingerprint, or card, or to set a password, follow the on-screen instructions and voice prompts.
When registering a face, make sure the entire face is inside the ellipse (about 30 cm from the camera). For correct fingerprint registration, place the same finger on the sensor three times in total. One user can register up to 10 fingerprints. When using a password, first select the lock symbol in the lower right corner of the screen, then enter your work number (ID), press OK, enter the password, and press OK again.
“Photo” – loads a user photograph, which can be displayed during verification on the reader. Note that it is not used for the actual authentication! A photo is taken automatically during registration.
“Valid date range” – disabled by default. It defines the time period during which the user is allowed access. If validity is active and the user attempts access outside the allowed period, the system will report that the validity has expired and access will be denied.
“User time zone” – assign up to five time zones during which the user will have access rights. By default, TZ 1 is assigned, which is always valid.
“Fingerprint alarm” – loads a fingerprint that, when used, grants access (opens the door for the set Door Open Time) and triggers the alarm output. The alarm can be disabled in the main menu (the “Alarm Off” icon). During setup, you can choose to register duress fingerprints (unregistered), set duress fingerprints (from already registered ones), delete duress fingerprints, or delete all.
Delete
By pressing the “Delete” button, a table for selecting a user opens. After entering the user’s ID, another table appears where you can select which item (Face, Fingerprint, Card, Password, Photo) you want to delete. The “Delete All” option removes all user data.
Edit
After pressing the “Edit” button, a table with the list of users is displayed first. By clicking the row of the selected user, the same table opens as when entering user data during enrollment.
Basic
“Language” – selection of the language displayed on the keypad. The default options are English or Czech.
“Sound” – enables/disables the sound signal when touching the display.
“Volume” – sets the volume of the sound signal and voice messages. The range is from 1 to 10.
“TR Auto Switch” – when enabled, an edit icon (pencil) appears in the upper-right corner of the home screen to modify the access type.
“Time Mode Type” – sets the descriptions of available access types (arrival, departure, doctor visit, etc.).
“Automatic Time Mode Change” – selection of the time period for each access type.
“Bell Settings” – sets the activation time and bell tone.
“Number of Rings” – sets the number of rings when the bell is activated, from 0 (disabled) to 255.
“Part” – edits the description of a section (branch, department, etc.) to which a user may be assigned.
Advanced
“Verification Mode” – selection of the user verification method. You can choose three basic methods: face, fingerprint, card and password individually, or any combination of them including password. “Any” allows verification by face OR fingerprint OR card.
“Face Detection Sensitivity” – detection sensitivity: normal, low, high. If you experience face detection issues, refer to the Other possible configuration issues.
“Face Anti-Spoofing” – ensures that the detected face belongs to a real person. If enabled, a photograph cannot be used for verification.
“Anti-Spoofing Threshold” – relates to the previous setting and determines the system’s sensitivity when verifying a live person (normal, low, high).
“Continuous Re-Verification” – when enabled, the reader continuously verifies a face within the recognition range.
“Face Identification Distance” – maximum distance at which the user can be verified. When set to “No limit,” the distance is not relevant.
“LED VR Level” – sets the intensity of IR or visible light used during face recognition. Higher levels improve readability in low light but may be uncomfortable or increase power consumption. Lower levels are more comfortable but may reduce recognition accuracy in poor lighting.
“Date and Time” – allows setting the date and time, including format and time zone.
“NTP Server” – sets the server address for time synchronization when the reader is connected to the internet.
“Time Synchronization” – synchronizes the time immediately, if the reader is online and an NTP server is configured.
“Printer” – allows connection of a serial printer (requires RS485-to-RS232 converter). After successful identification, the time of card placement can be printed.
“RS485 Speed” – sets the printer speed.
“Visitor Mode” – allows temporary use of the reader by individuals who are not regular system users (e.g., guests, contractors, temporary workers).
“Photo Settings” – selects which photo is shown after successful verification: none, uploaded photo, or real-time camera image.
“Photo Display Time” – duration for which the user’s photo is displayed after verification.
“Save Expired Logs” – keeps logs of entries/events even after they exceed the configured retention time.
“Use Error Log” – enables storing error messages for later diagnostics.
“Number of Admins Allowed” – defines the maximum number of administrator accounts, up to 5.
“Calibrate Sensor” – starts a calibration of the fingerprint sensor based on ambient light. Takes up to one minute. If the fingerprint pattern is unclear, cover the sensor with a black object, press OK, and complete the process.
“Show FP-Fail” – displays an error message when fingerprint verification fails.
“Upgrade Firmware” – updates the reader firmware via a connected USB flash drive (USB must be in FAT format). Insert the USB drive with the firmware and press Firmware Update. Do not disconnect power during the update.
“Factory Settings” – resets the reader to factory defaults; the user database is preserved.
“Clear Time Log” – removes arrival/departure logs.
“Clear Admin Log” – removes administrator activity logs.
“Clear User Database” – deletes all registered user data.
“Delete Photos” – options include deleting time log photos, user photos, or all photos. Only all selected photo types can be deleted at once; individual photo selection is not possible.
Power
“Restart At” – sets the time when the reader should automatically restart (equivalent to power cycle).
“Screensaver Mode” – choose a photo, standard display, or completely turn off the screen during inactivity. In the standard mode, the time is shown on the display. The reader wakes from sleep when motion is detected.
“Sleep After” – sets the duration (in seconds) after which the reader enters sleep mode; 0 means never.
“Photo Change Interval” – when a photo screensaver is used, this sets how often it changes.
Communication
“TCP/IP Settings” – allows the device to receive data from the server either once (fetch) or continuously (auto fetch). The MAC address is also shown here.
You can choose between automatic IP assignment via DHCP (Yes) or disable DHCP and set the parameters manually.
The WiFi menu allows managing wireless connection parameters. Enable WiFi, select the appropriate WiFi network under “Select WiFi Hub,” enter the password, wait for the “Connecting to WiFi hub…” message, and see the result. Under “Connection Information,” you can check connection status and additional details. Also verify the P2P settings, including the correct IP address and connection status.
“Device ID” – required for connecting the software to the device.
“TCP Port” – 5005; must not conflict with the PC software port or the connection will fail.
“Communication Password” – default is none. After setting a password, the software must use the same password.
“Server-Client Mode” – default is logClient (device acts as a client, receiving data from the server). Other options:
WebSocket – real-time communication
FkWeb – data exchange via web interface
“Event Transfer Mode” – sets how real-time logs are transmitted via TCP/IP or number input (not available in web mode).
“Host PC Address” – IP address of the PC that receives real-time logs (not available in web mode).
“Host PC Port” – default is 5005 (not available in web mode).
“P2P Settings” – configuration for communication with the application server.
IP address: 077.240.176.088
Port: 4003
The unique device ID for registering the reader in SYSDO is also displayed.
Connection status indicates the current state (“Registered” means connected).
Log
Contains settings for log file overflow warnings. When a specified limit is reached, an alert appears indicating the log is full.
Example: If the limit is 500 and the total capacity is 100,000 records, an alert appears at 99,500.
“Verification Time” – range 0–255 minutes. Multiple verifications within this interval record only the first event.
“Repeated Door Open Interval” – 0–600 minutes. During this interval, the door will not open again.
Access
“Define Time Zone” – configure up to 50 time zones for access control. Each period corresponds to days Monday–Sunday. Setting 00:00–23:59 allows unlimited access.
“Door Unlock Time” – 0–255 seconds; the relay activation time.
“Door Open Timeout” – 0–255 seconds; maximum allowed door-open time before triggering an alarm. Requires a door sensor and correct sensor type (NO—open, NC—closed).
“Door Sensor Type” – choose type of connected door sensor (magnet): none, NO—open, NC—closed.
“Duress Setting” – enables duress password and sets alarm delay (0–255 seconds).
“Monitor Tamper” – tamper switch triggers an alarm when the reader’s cover is opened. Does not react to removal from the wall.
“Wiegand Output Type” – selects Wiegand output format and bit length. Supports cross-Wiegand. Default is 34. Determines data format sent from the reader, such as device ID + user ID in Wiegand 34 format.
“Send Card ID to Wiegand” – sends card identification number via Wiegand to another device (e.g., access controller).
The reader supports Emmarine 125 kHz cards by default.
“Antipass” – anti-passback function to prevent repeated entry or card sharing.
“Use FP Reader” – used with RS485 fingerprint reader. For both entry and exit, a fingerprint must be scanned. When enabled, two additional FP reader settings appear.
Test
Contains basic hardware tests of the reader.
They can be launched individually or all at once using “Test All”.
Follow the on-screen instructions for each test.
The USB Disk menu includes available operations for working with a connected USB flash drive, primarily for downloading or uploading the user database. This allows you to transfer the user database from one reader to others.
Use a USB drive formatted as FAT32. Insert the USB drive, select the appropriate function, and then export the data to the USB drive.
Download new time log
Download all time logs
Download new admin log
Download all admin logs
Download user database
Download user database (XML)
Upload user database
Upload user database (XML)
Individual menus contain information about the number of registered users, the number of enrolled fingerprints, faces, etc.
They also provide information about hardware and firmware versions, the option to browse time and admin log files, and display the user list.
Enroll Info
This menu displays the number of registered users, enrolled fingerprints, faces, etc.
These values are for viewing only and cannot be edited in this menu.
Device Info
Device info contains information about hardware and firmware versions.
Advanced
“Show Time Log” – displays an overview of access records for the selected user.
“Show Admin Log” – overview of operations performed by a user with administrator permissions.
“Show User List” – displays the list of users including the number of enrolled fingerprints and face data.
3. The administrator permission reset
Follow these steps:
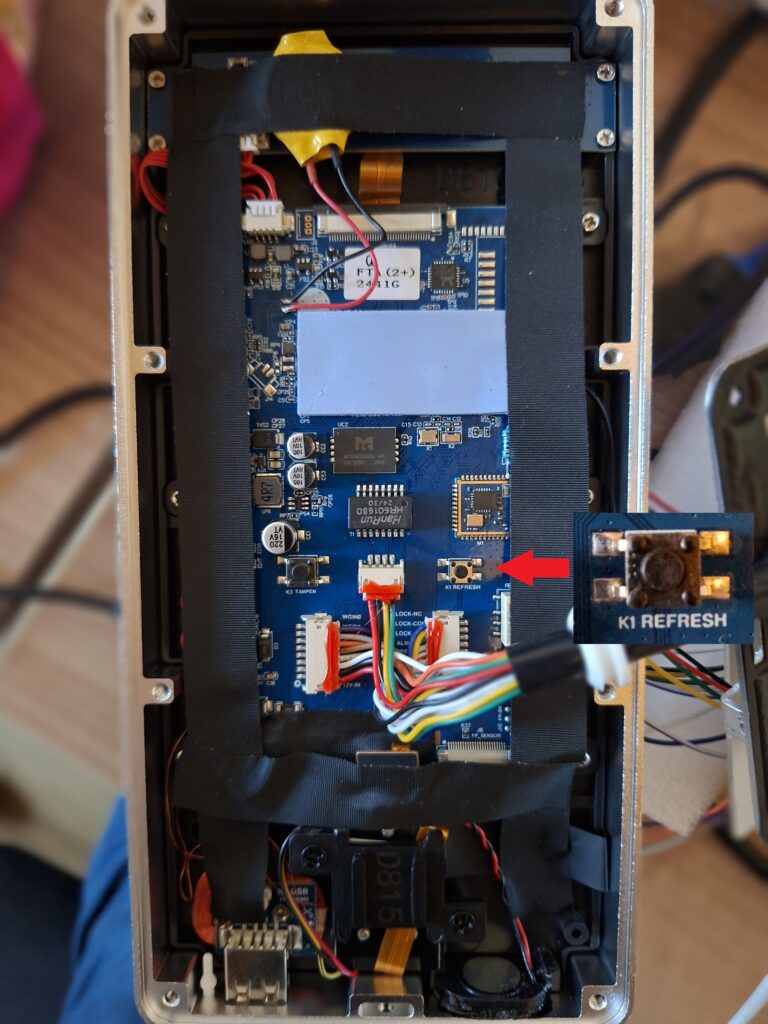
1. Remove the screws on the back of the reader and take off the protective cover.
2. Briefly press the button shown in the image below.
3. Disconnect the device from the power supply.
4. Press and hold the button identified in step 2, and while holding it, reconnect the device to the power source.
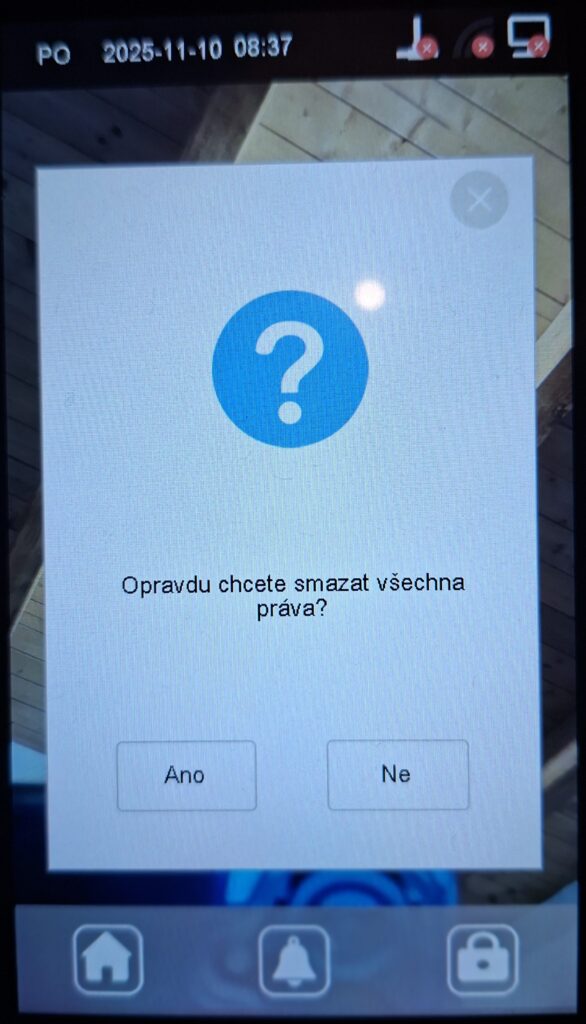
5. Wait until a confirmation message appears on the reader’s display (see the image on the right below).
6. Select Yes to perform the administrator permission reset. After confirmation, the administrator permissions will be restored to their default state, and access to the main menu will once again be available without restrictions.
4. Resetting the reader to factory settings
If you selected the factory settings on the reader, you need to reconnect the device to the SYSDO system. Procedure for re-establishing the connection via Ethernet:
Menu → Settings → Advanced → Factory Settings
Menu → Settings → Basic → TR Auto Switch: Yes
Menu → Settings → Communication → TCP/IP Settings → DHCP: Yes
Menu → Settings → Communication → WiFi → Use WiFi: No
Menu → Settings → Communication → P2P Settings → P2P Server IP: 077.240.176.088
Menu → Settings → Communication → P2P Settings → P2P Server Port: 4003
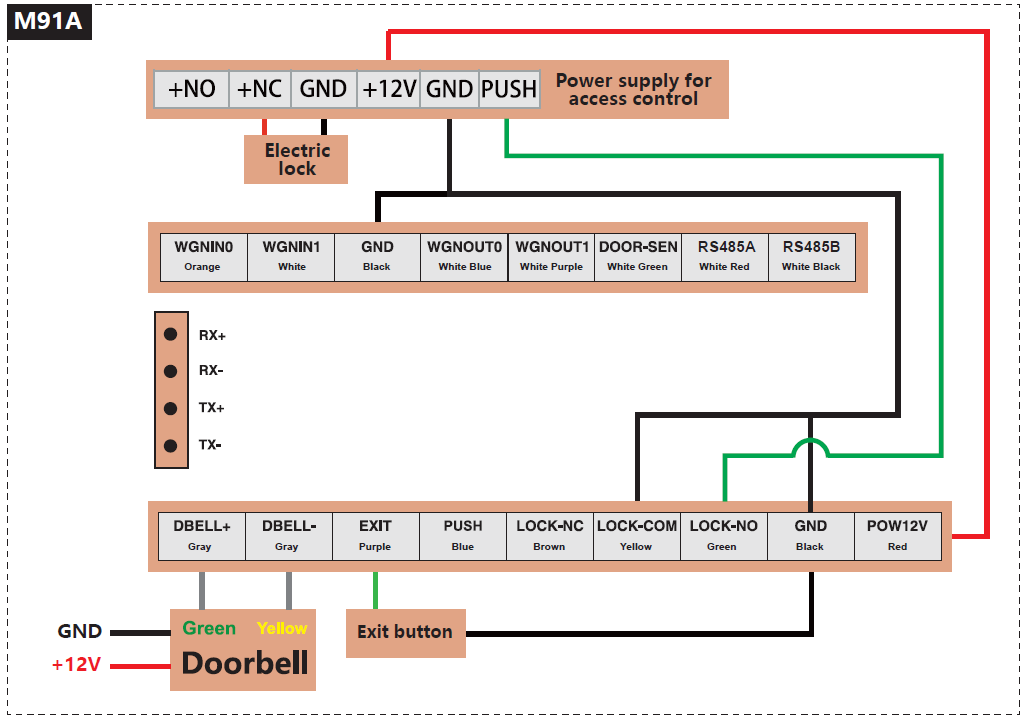
5. Wiring diagram
6. Frequently asked questions (FAQ)
Why are employee accesses not visible in the access overview?
It is possible that the reader is not communicating, and therefore the data from the reader has not been transferred to the system. Please check the connectivity of the reader.
Users can still register accesses even if the reader is not communicating. These accesses are stored in the reader and will be sent to the system as soon as the reader reconnects.
How can you tell if the reader is not communicating?
On the reader’s screen, a connectivity icon is displayed in the lower right corner. If this icon is overlaid with a red cross, the reader is not communicating.

In Administration - Readers, connectivity can be identified by the Last Data column. Green coloring indicates normal operation, while orange or red colors indicate the reader is not communicating. The same color coding is also used in the application header, where colored bubbles with numbers are displayed.
If a user is set as a HW manager of the reader (Administration - Users - user edit - Permissions tab - HW Reader Management) and has a contact email filled in (Administration - Users - user edit - General tab - Contacts), they will also receive a warning email in case the reader stops communicating.
Why is the reader not communicating?
Possible reasons include:
- Incorrectly entered IMEI number
- In the reader’s administrator interface (house icon on the reader screen in the top left corner), the unique reader identifier (IMEI) is displayed in the bottom right corner
- Check if the IMEI matches the IMEI entered in the web application (Administration - Readers - edit reader - General tab - IMEI)
- IMEI should be entered without dashes!
- Incorrect communication settings with our server
- The reader is not connected to the internet
- Check if the cable is properly connected and not damaged
- Verify that the internet connection works on the used cable (e.g., connect the cable to another device and check the status)
- Check if there is an issue with the reader’s connection (e.g., connect the reader to a cable you know works and check the status)
- Internal network settings blocking communication, such as firewall or port restrictions (ports 4000 and 123)
- This issue needs to be resolved with the company’s network administrator
How can a user authenticate using a password?
The procedure for password authentication on the Face reader model (SYSF203):
- On the reader screen, select the lock icon (top right corner).
- The reader will prompt you to enter the user ID (number) – you must enter the user’s PIN from the SYSDO system (Administration – Users – edit user – Authentication tab – Codes section – PIN).
- The reader will then prompt you to enter the password – you must enter the user’s Password from the SYSDO system (Administration – Users – edit user – Authentication tab – Codes section – Password).
7. Other possible configuration issues
Problem | Possible cause | Solution |
|---|---|---|
Reader not communicating |
|
|
Frequent user mix-ups |
|
|
Rejection of registered users |
|
|
Cannot change access type on the reader |
|
|
Abnormal reader behavior |
|
|
*The MAC address can be found in the Reader Menu – Settings – Communication – TCP/IP Settings.
The unique device ID can be found in the Reader Menu – Settings – Communication – P2P Settings.
** In the Reader Menu – Settings – Communication – TCP/IP, WiFi, or P2P
• Check the DHCP and IP address settings (correctly assigned IP address), WiFi enabled, or P2P communication settings with the application server.
*** In the Reader Menu – Settings – Advanced – Face Detection Sensitivity
• Normal level (default) – provides a good balance between security (low FAR) and user convenience (low FRR); it is very unlikely that the system will confuse users.
• High level – increases face detection sensitivity; however, some users may need to find a better head position, improve lighting, etc., for verification; the correct verification procedure can be found in Administrators manual – Chapter 1.3 Tips for Face Verification.
• Low level – increases the likelihood of allowing unauthorized persons or confusing users.