Cameras

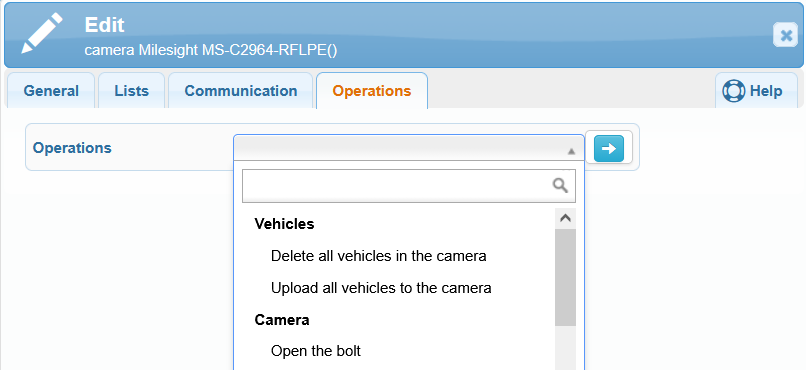
In Cameras, an overview table is available that contains basic information about individual cameras. The first column of the table contains icons for basic camera operations (). The table allows you to:

  • sort cameras alphabetically by name,

  • filter cameras by area, status, model, firmware, or serial number,

  • display the time of the last recording,

  • view the number of assigned vehicles for each camera.

Adding a camera via the web application

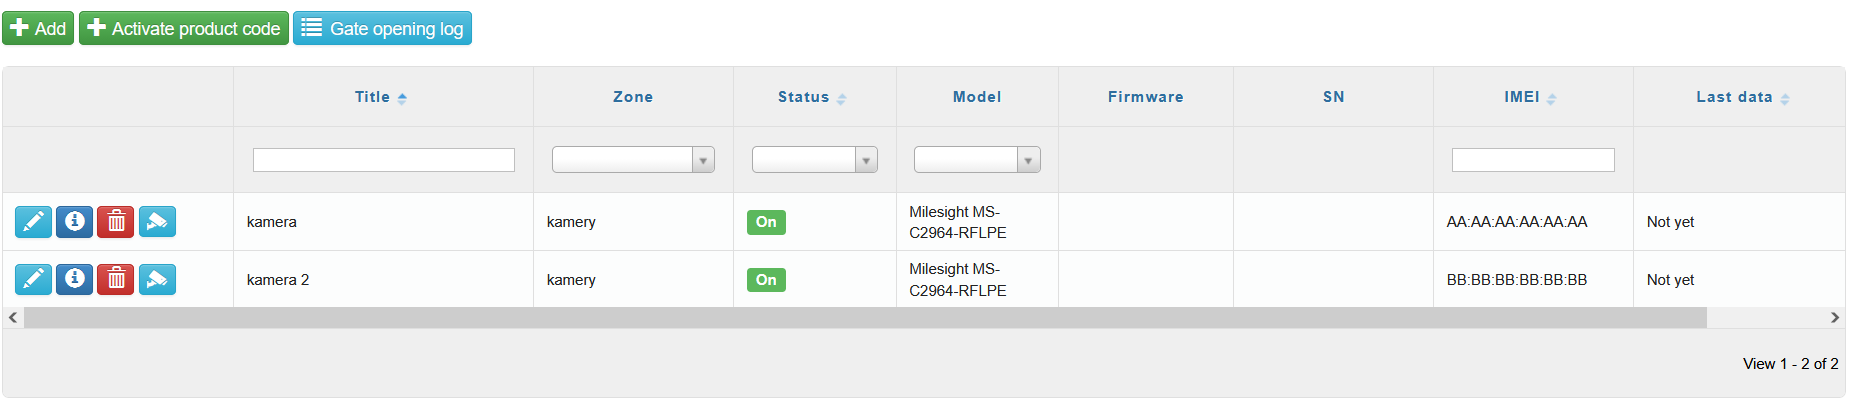
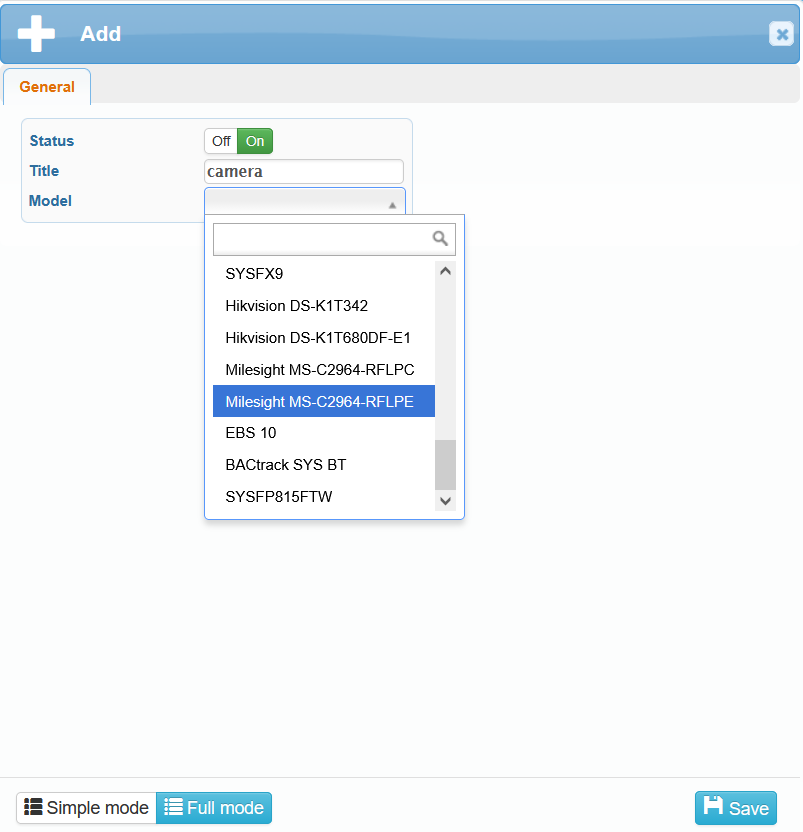
You can add new cameras to the system using the icon in the upper-left corner of the screen. After selecting it, the Add window will open, where you enter:

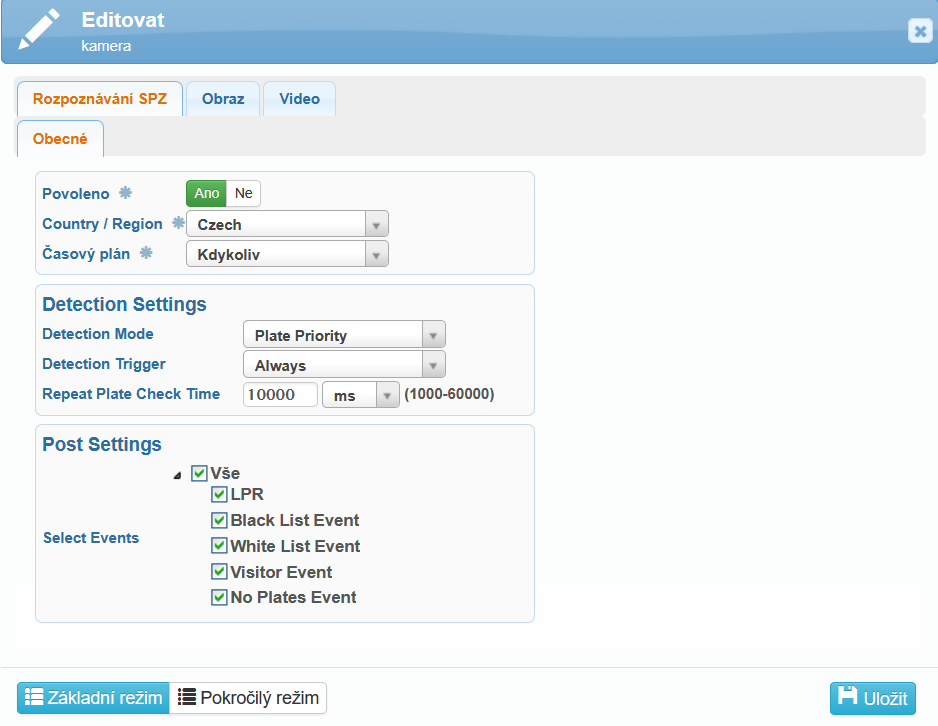
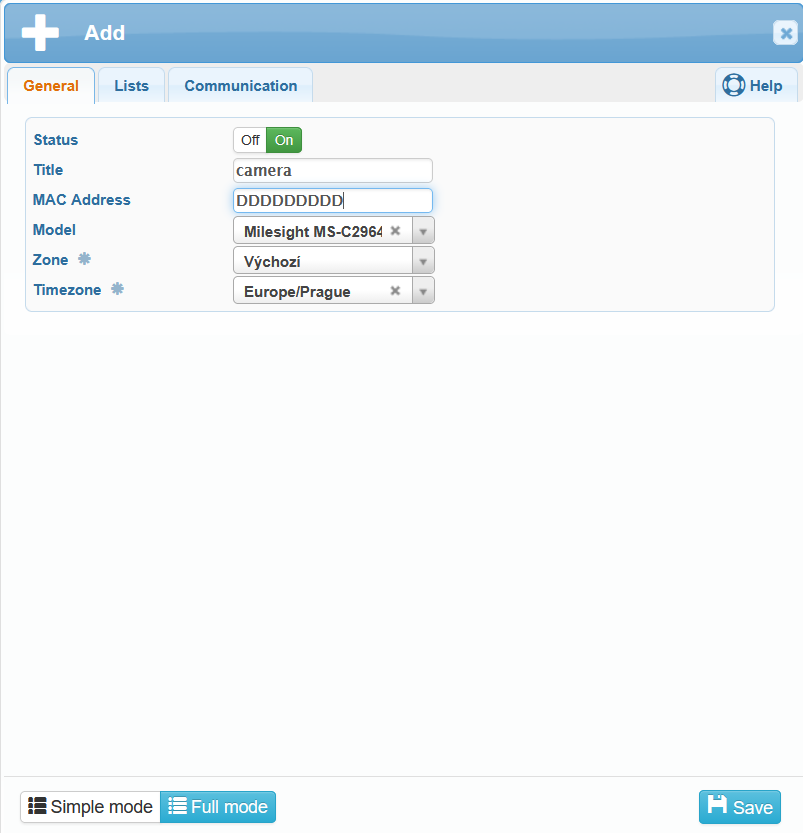
Additional tabs will then become available. In the General tab, complete the following:

  • MAC Address – (You can find the MAC address in the camera’s web interface: Settings → System → System Setting → System Info → MAC Address)
  • Zone – If this field cannot be edited, the setting is inherited from the connected reader. Configure it on the connected reader.
    • By default, Default is selected.
  • time zone – If this field cannot be edited, the setting is inherited from the connected reader. Configure it on the connected reader.
    • The default time zone is Europe/Prague.

In the Lists tab, select which user lists the camera should work with. If the camera recognizes a license plate that is included in a selected list (e.g. on the whitelist, in a visitor list with a corresponding time rule, etc.), the barrier will open automatically and the vehicle will be granted access.

In the Communication tab, configure the following parameters and save the settings:

  • IP – enter the camera’s IP address on the network so the system can communicate with it.

  • Port  – enter the port number used by the camera for data transmission.

  • Login – enter the username for logging in to the camera.

  • Password – enter the password for the camera user account.

Editing a record via the web application

Camera editing includes an additional Operations tab. Using this tab, you can perform the following actions:

  • delete all vehicles in the camera,
  • upload all vehicles to the camera,
  • open the bolt.

Editing a camera via the web application

In the first column of the overview table, in addition to other icons, there is also an icon for editing the camera settings.

The first tab, License Plate Recognition – General, is used to configure license plate recognition settings.

  • Enabled
    • Yes – license plate recognition is active.
    • No – license plate recognition is disabled.
  • Country / Region – this selection optimizes the license plate recognition algorithm according to the specific characteristics of license plates in the selected region.

    • What does the Country / Region selection affect?
      • Recognition accuracy – each country uses different license plate formats; selecting the correct region helps improve detection accuracy.
      • Character filtering – some regions use specific characters or colors on license plates, which the camera can recognize more effectively when properly configured.
      • Predefined templates – the camera can apply region-specific algorithms, reducing recognition errors.
  • Time Schedule – defines the time period during which license plate recognition is active.

    • Always – license plate recognition is always active.
    • Never – license plate recognition is disabled.
    • Other configured time plans.

Detection Settings section

  • Detection Mode – defines how the system detects objects (e.g. vehicles or license plates).
    • Plate priority – the system prioritizes recognition of vehicle license plates over identification based on vehicle type or other attributes.
    • Vehicle priority – the system prioritizes vehicle detection (e.g. presence, type, size) over license plate recognition.
  • Detection Trigger – defines when the system starts detection.
    • Always – the system continuously detects objects regardless of external triggers.
    • Alarm input – the system starts detection only when an external alarm input is activated (e.g. a sensor, button, or other signal).
  • Repeat Plate Check Time – defines the time interval between repeated attempts to recognize a license plate. Lower values result in more frequent checks, while higher values reduce system load but may increase detection time.
    • Default value: 10,000 ms (10 seconds)
    • Range: 1,000–60,000 ms (1–60 seconds)

Post Settings section

  • Select Events – defines which events are recorded or evaluated by the system.

    • All – the system records all detected events without restriction.
    • Selected only – the system records only events selected by type:
      • LRP – registered vehicles on a list (Licensed / Registered Plate).
      • Whitelist – vehicles on the allowed access list.
      • Blacklist – vehicles on the denied access list.
      • Visitors – visitor vehicles.
      • No plates – detection of vehicles without a license plate.

The second tab, Image – OSD, is used to configure photo capture and on-screen display (OSD) information shown directly in the video (e.g. time, camera name, font). OSD settings can be applied individually to each stream.

  • Primary stream – the main video stream, typically in high resolution, intended for recording and primary monitoring.
  • Secondary stream – a secondary stream, often with lower resolution, suitable for live viewing or remote access with reduced network load.
  • Tertiary stream – an additional stream, usually with the lowest quality, used for specific applications such as mobile devices or quick previews.

The third tab, Video, is used to configure video recording in general mode and during events (e.g. vehicle arrival, vehicle departure). Video settings can be configured individually for each stream; however, the distinction between general mode and event-based recording is available only for the primary stream.

The following parameters can be configured in the Video tab:

  • Video codec – defines the method used to compress video recordings.
    The default value is H.264, which provides a good balance between image quality and file size and is widely supported by most devices and media players.
  • Resolution – defines the image size in pixels.
    The default value is 1920 × 1080 (Full HD), which provides sufficient detail for vehicle and license plate identification. Higher resolutions improve image quality but also increase storage and data transmission requirements.
  • Bitrate – defines the amount of data transmitted per second and has a direct impact on image quality and recording size.
    The default value is 4096 kbps, with an adjustable range of 16 to 16384 kbps. A lower bitrate can be set for general mode to save storage space, while a higher bitrate is recommended for events (e.g. vehicle arrival) to capture as much detail as possible.
  • Maximum frame rate – defines the number of frames per second.
    The default value is 25 FPS, with a range of 1–50 FPS.
    A lower frame rate may be suitable for general recording, while a higher frame rate can be set for events to ensure smoother motion capture.